| This site was founded by the late John Skakel. Contact us HERE
Cemeteries Office Staff have asked that users NOT contact them with questions directly. Cemetery Preservation An introduction
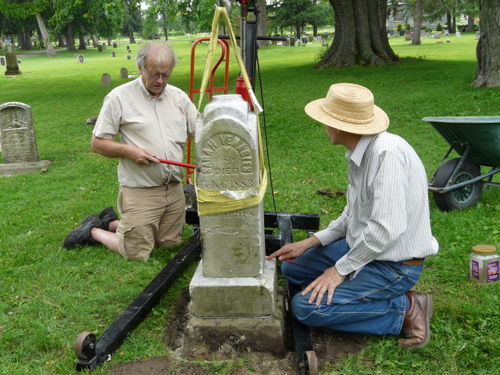
Note the Use of Strap
to lift the stone.
NEVER metal chains!
Photo by T Nigh |
Tools of the trade.
Here is a list of some of the tools that you may wish to use...
1. Small plastic garden tools are available in Canadian Tire or Home Hardware in sets. If memory serves they are only about $2 per tool for a set of 3 in Canadian Tire. Plastic is a must for working around the stones in order not to scratch them.
2. Knives. One member mentioned to us that she has used a sharp knife to cut soil around stones. Since these are metal you would want to avoid any contact with the stones if possible to avoid scratching them but this indeed sounds like a great method. I would think that a bread knife in particular would be a great tool. She also mentioned using a plastic painter's guide available very inexpensively to shield the stone from the knife to avoid scratching and damage to the stones.
3. Shovels. A straight mouth spade will work great if you have one. They are easy to find in stores. You do not need an expensive one. Other shovels will work but are not as easy to use and it is very MUCH easier to cause damage to stones with other types. I would suggest that a straight mouth space and plastic garden tools are the only things that you might want to consider purchasing for this project.
4. Prod replacements. You can use a large screwdriver for instance to stick in the ground. Not as easy, but it does work and you do not have to purchase a prod this way. You probably have one at home for free. Even a broken one will work great.
5. Broom, soft brush, and water pail. A broom or small "whisk broom" can come in very handy to clean gravel or dirt off of stones. A water pail and a soft brush can also be useful to wash off stones and clean them up, etc.
6. Prods. I suggest that you do NOT purchase tile prods from stores. The reason is that they will probably cost you as much as $65 or more. And, they do not work well. Note the instructions here on making your own prod. It is much less expensive. And it will work MUCH better!
Please remember that once soil becomes very dry prods become difficult to use. We all have to use other means until it rains again. If it gets too dry, it can actually stall all of our work almost completely due to hard soil, etc.
7. Wheel Barrow. You may wish to have a wheel barrow if you wish to work alone a good deal. However, this is certainly NOT a necessity. We also realize that these are not easy for some folks to use. They are not easy to carry to the site. And they do cost money. Not everyone needs a wheel barrow to take part in these projects.
8. Leverage tools. Unless you get very highly involved in the project you will not need any of these. Extended experience will show you what might be useful to you if you do decide that you would like to use such. Those more involved with the project will likely provide these.
9. Wooden levers. You may find you would like to make some wooden levers for lifting, but I would certainly not advise you get such til you find if you need them. Again you will not unless you are very much involved with the project.
10. Use of Limestone Mortar requires use of special dental type tools. Please see section on "Pegging Stones" to see information on them.
How to make a proper prod.
If you are a member of our Chatham Kent group, please contact John Skakel. I can get prods made that work great and are VERY inexpensive.
I cannot stress enough that you should try to have a proper prod made rather than purchasing one. They will work much better. Any welding shop will be able to make one for you. Many hobby shops with a welder could as well. If you do not know of such a place near you I suggest you go to a hardware and ask them where they could be found. We use two different sizes.
The most common one is made as follows.
1.
Cut a piece of 7/16 inch rod about 40 inches in length. Point one end. Cut a handle for the prod from 1 1/4 inch hollow pipe about 8 inches long. Weld the 40 inch piece to the 8 inch handle to form an upper case "T" shape. Again the bottom end should be pointed. Just above the point where the rod only just becomes 1 1/4 inches across, use the welder to make a knob of metal. The purpose of this knob is to shove the soil away, thus preventing friction all of the way up the hole that is caused by inserting the rod into the soil. The most important two points here are the pointed end, with the round knob only just above the point. This type of prod is great for prodding straight down and finding larger stones lying flat under the ground, etc. This is the first prod you should purchase. It is also great for finding the edges of stones, allowing you to put your shovel closer to them without making physical contact.
2. The second type of prod uses a shaft that is around 50 inches long with a handle about 20 inches across. Otherwise you construct them EXACTLY the same as those above. The longer length of this prod allows you to prod deeper if you wish, but what this is really used for is to prod on an angle to find the smaller stones. Use it to prod in at an angle of about 45 degrees looking for stones with a relatively large up down face, but with a small surface facing upward. The small surface facing upward means that they will be VERY hard to locate by prodding straight down with the prod above.
3. You will find the long prod very cumbersome to use for straight down prodding work. Almost impossible. Similarly the short prod will be too short to allow angle prodding with ease.
4. 3/8 inch rod can also be used. However, it does bend easier although in some cases can go in easier. It is personal preference which one you use. I like the fact that the larger rod is harder to bend.
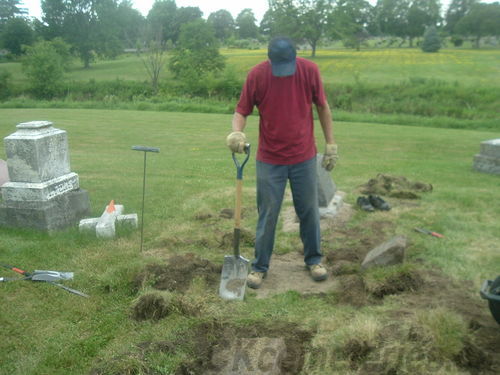
Note the prod, plastic shovel (red handle) on right,
square mouth spade in Paul's hand, and pry bar
(on left) with red handle,
and wheel barrow wheel barely visible on right.
Photo by John Skakel |
Using Compounds like Epoxy and Mortors
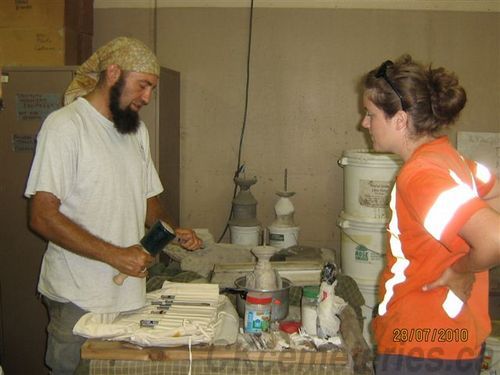
Sach teaching student in Guelph to carve stones.
Note carving tools on white cloth pad. |
Epoxy and Limestone Mortor.
WARNING!!! We are still trying to work this out ourselves. If you have large numbers of stones to do, it takes a long time to use the proper limestone mortors, mixing them up with the correct stone dust, etc. However, we have also been shown the damage of using the wrong premix compounds.
This area will be updated as we gain more information.
- Most premix compounds (putty like substances) are not water permeable. This problem we have found is NOT explained well on most sites. Once we began to hear the description in detail it made more sense. We always thought. Water should work through a stone from top to bottom or bottom to top (it can go both ways), and work it's way to the edges and dry there right? So why this water problem. What is not explained on other sites is exactly that. The water will find the edge of those non water permeable compounds and work it's way to the edge. Dry. And leave salts and other compounds on the stone. And it is those locations that can cause harm. It will take a long time. But gradually you will see small rounded edges on those stones. right where the water works it's way to the edge. But if you let the water work through the stone, there is less of those compounds in one spot, and thus less damage.
- So, premix compounds in stones that DO NOT allow water penetration should be avoided when possible. There is a water permeable compound out there being sold by a company that tell you that you must pay huge money for their courses or they will not sell you the compounds. You just add water. We have used that compound extensively and had good luck with it though we have not taken the courses. If you can purchase it we do recommend it.
- There is also another compound that is a premixed powder as well. All you have to do is to add water to make it into a paste as the one above. And we have gotten reliable information that this works well for almost every application. Yes, you have to mix it. However, this is a simple one step mix and we believe it may be at least a partial solution to problems. It is by a company named Daubois. They make both a pointing limestone [ XHN-60 ] and bedding mix limestone mortar [XHN-101 ] to set stones into bases.
- One thing we have learned is that limestone mortar can often be used to attach pieces back together but this of course is a technique that takes a fair bit of skill.
- Re Epoxy. We have found the following. Probably the best solution is to put in stainless steel or fiberglass rod. Epoxy around that. Then fill the crack. BUT! Remember that the disadvantage is that the rods may break out the stone much worse again if that break is challenged again at some point. If all goes well, the stone may last longer with rods. But if that stone is challenged and is broken again, it may be ruined to the point of not being repairable again the next time. Also if you have huge numbers of stones to repair as we do, you may need to ask yourself is it better to repair more in a way you have a hope of getting many finished, or is it better to repair in a way that you will never be able to repair a tiny percentage of the total number you need to do.
- Re Epoxy Types. Caution... NEVER NEVER NEVER use Silicone as an epoxy to glue monuments back together. It does not allow water movement almost everywhere, yet it will have small pin holes in places that tend to run the water in, thus causing the worst of both cases. It is the absolute worst thing that you can do to a monument!
We have used about 6 different epoxies, and in all cases, used materials that share similar characteristics for strength. The differences are mostly related to setting times, viscosity, and cost. It is imperative to select the right epoxy for the job. Our repairman with the most experience in our group writes as follows. I recommend a concrete epoxy, capable of setting in a moist environment, with a high shear strength [ typical of most concrete epoxies ] and a setting time of at least 30 minutes. In all cases, the epoxy bond is comparably strong. However, if a failure occurs, it is generally related to blunt force trauma to the monument, typically from lawn mowers, and rarely from vandals. When I say refer to a failure, in every case, the failure is not the epoxy joint, but rather breakage occurring approximately 2 mm above or below the epoxy joint in the monument itself. To repeat, the epoxy does not fail, but rather the monument material itself fails. Monuments made of granite rarely break, and we've found that trauma breakages occur in marble, limestone, and sandstone in order from strongest material to the weakest. One other case for epoxy failure may occur if the actual monument has become grossly weakened from long term exposure to water. A typical example would be a marble slab monument, buried in the earth and constantly exposed to moisture for well over 35 years . As well, the poorer the quality of the marble the greater rate it deteriorates with moisture. In these cases, the epoxy joints are only as strong as the material that is being repaired. We have found if a blunt trauma occurs, even a light blow, the monument will break again, approximately 2 mm above or below the joint - the epoxy itself does not fail, but rather the stone fails. The poorer the condition of the monument, the less dense the stone is and the epoxy does not have a solid material to bond together.
The materials Loctite E-30CL and #M Scotch-Weld DF-460 are more viscous and tend to easily run, especially on a hot day. They both tend to change from clear to a yellow colour as they harden. The primary draw-back is they come in small tubes and are very costly . They will suffice in very small repairs. Again though, this repair is costly for the small amount of surface area repaired. Another product used successfully is from a company called RedHead . They offer a full range of products much the same as the products mentioned above. RedHead A-7 works well, has a rather strong odour, comes in small and medium sized tubes, and tends to be costly. My favourite epoxy is RedHead G5 . Although you need to buy a dispensing gun for it, the catalyst/base combined tubes come as 22 fluid ounces [ 650 ml ], is the most colour stable, offers a 30 minute set time [ faster on a really hot day ] and is reasonably priced. The bottom line is, this product [G 5 ] offers the most material at the best price, and will cover large surface areas of broken monuments .
Tools to lift Heavy Stones
Using Bars and Mechanical Lifts
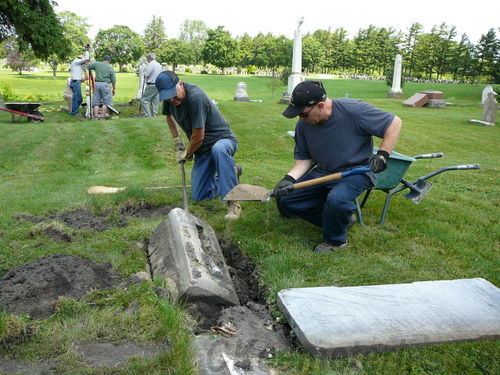
Using a bar to lift a base back to the surface |
Use of Bars, and an Engine Lift.
As you proceed you will find that you will need to do lifting of stones in your cemetery. Straightening small spire stones. Placing stones back on bases. That sort of thing. This is not a science that you can easily describe. It is as so many other areas a "Learn to do by doing" experience.
Many stones can be lifted with the back of a straight mouth space being sure to keep soil between the stone and your shovel to prevent damage. Heavier stones can be lifted to place with long bars. You can find bars that are round on one end and square on the other that are 5 feet long. You will probably find two of these are a must if you are working in a large cemetery. Remember that often the stone bases for instance are too heavy to lift out, but you can easily lift them on one end, allowing you to lift one end and then the other, gradually walking them to the surface.
However, you might consider using an engine lift to do some of the heavy lifting. They do work well although there are times when it is hard to get the lift arm close enough to the stone due to the width of the feet, etc. But always remember that when lifting, you NEVER allow a metal chain to come into contact with the stone. Always use the fiber belts, and make certain that the one you use is strong enough. For instance, if the maximum working load is 4,000 pounds, we could try to only lift a maximum of 2000 pounds with that belt. That gives you a good window as the breaking point is probably 8,000 pounds. You can though for instance lift one side of a stone by bringing the belt up to the lift on that low side. It will nicely tip allowing you to put gravel underneath.
Many sites describe making a tee pee shaped device with a chain lift. However, remember that in today's modern world, you will be much better if you use a device that is made to lift and has not been altered. If you make other types of devices, and something fails, you will be more likely to have very severe legal problems than if you are using a device that was made to lift and has not been altered.
Note the Position of the two straps
One on each side
to lift the stone
Photo by T Nigh |
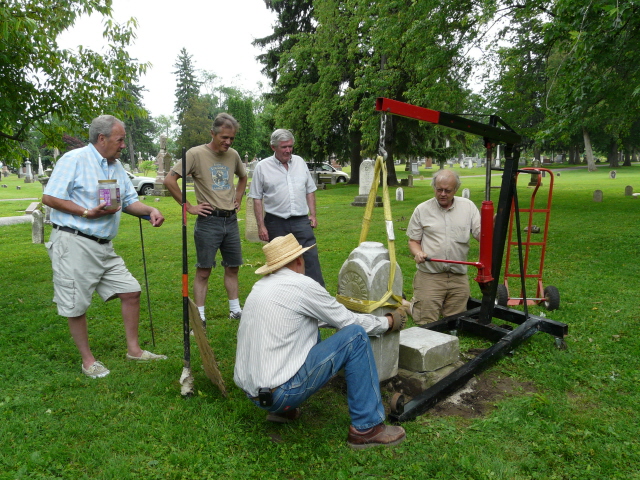
John and Bruce using our Engine Lift.
Note that no metal chains are used. Only fiber belts.
Photo by John Skakel |
|